Mini-ITX Build Log & Review: Corsair Obsidian 250D & EVGA Z170 Stinger (Page 2)
POST & Software Installation
With everything connected, it came time to power up and pray to the POST gods. First time was the charm, and everything worked perfectly. I installed Windows 10 from a USB stick, and the whole process took less than 20 minutes. The only subsequent setup “issue” I ran into was that I needed to dump the drivers from the motherboard CD onto a USB stick using another machine, as Windows 10 didn’t have a native driver for the network adapter.
After that it was copying my Steam folder across the network, then downloading and installing updated Radeon and motherboard drivers.
Copying my Steam games across the network actually took longer than installing Windows. But, 30 minutes to copy 160GB beats re-downloading any day of the week. In total, it took just over an hour from first POST to fully configured.
Environmental Improvements - Size, Heat & Noise
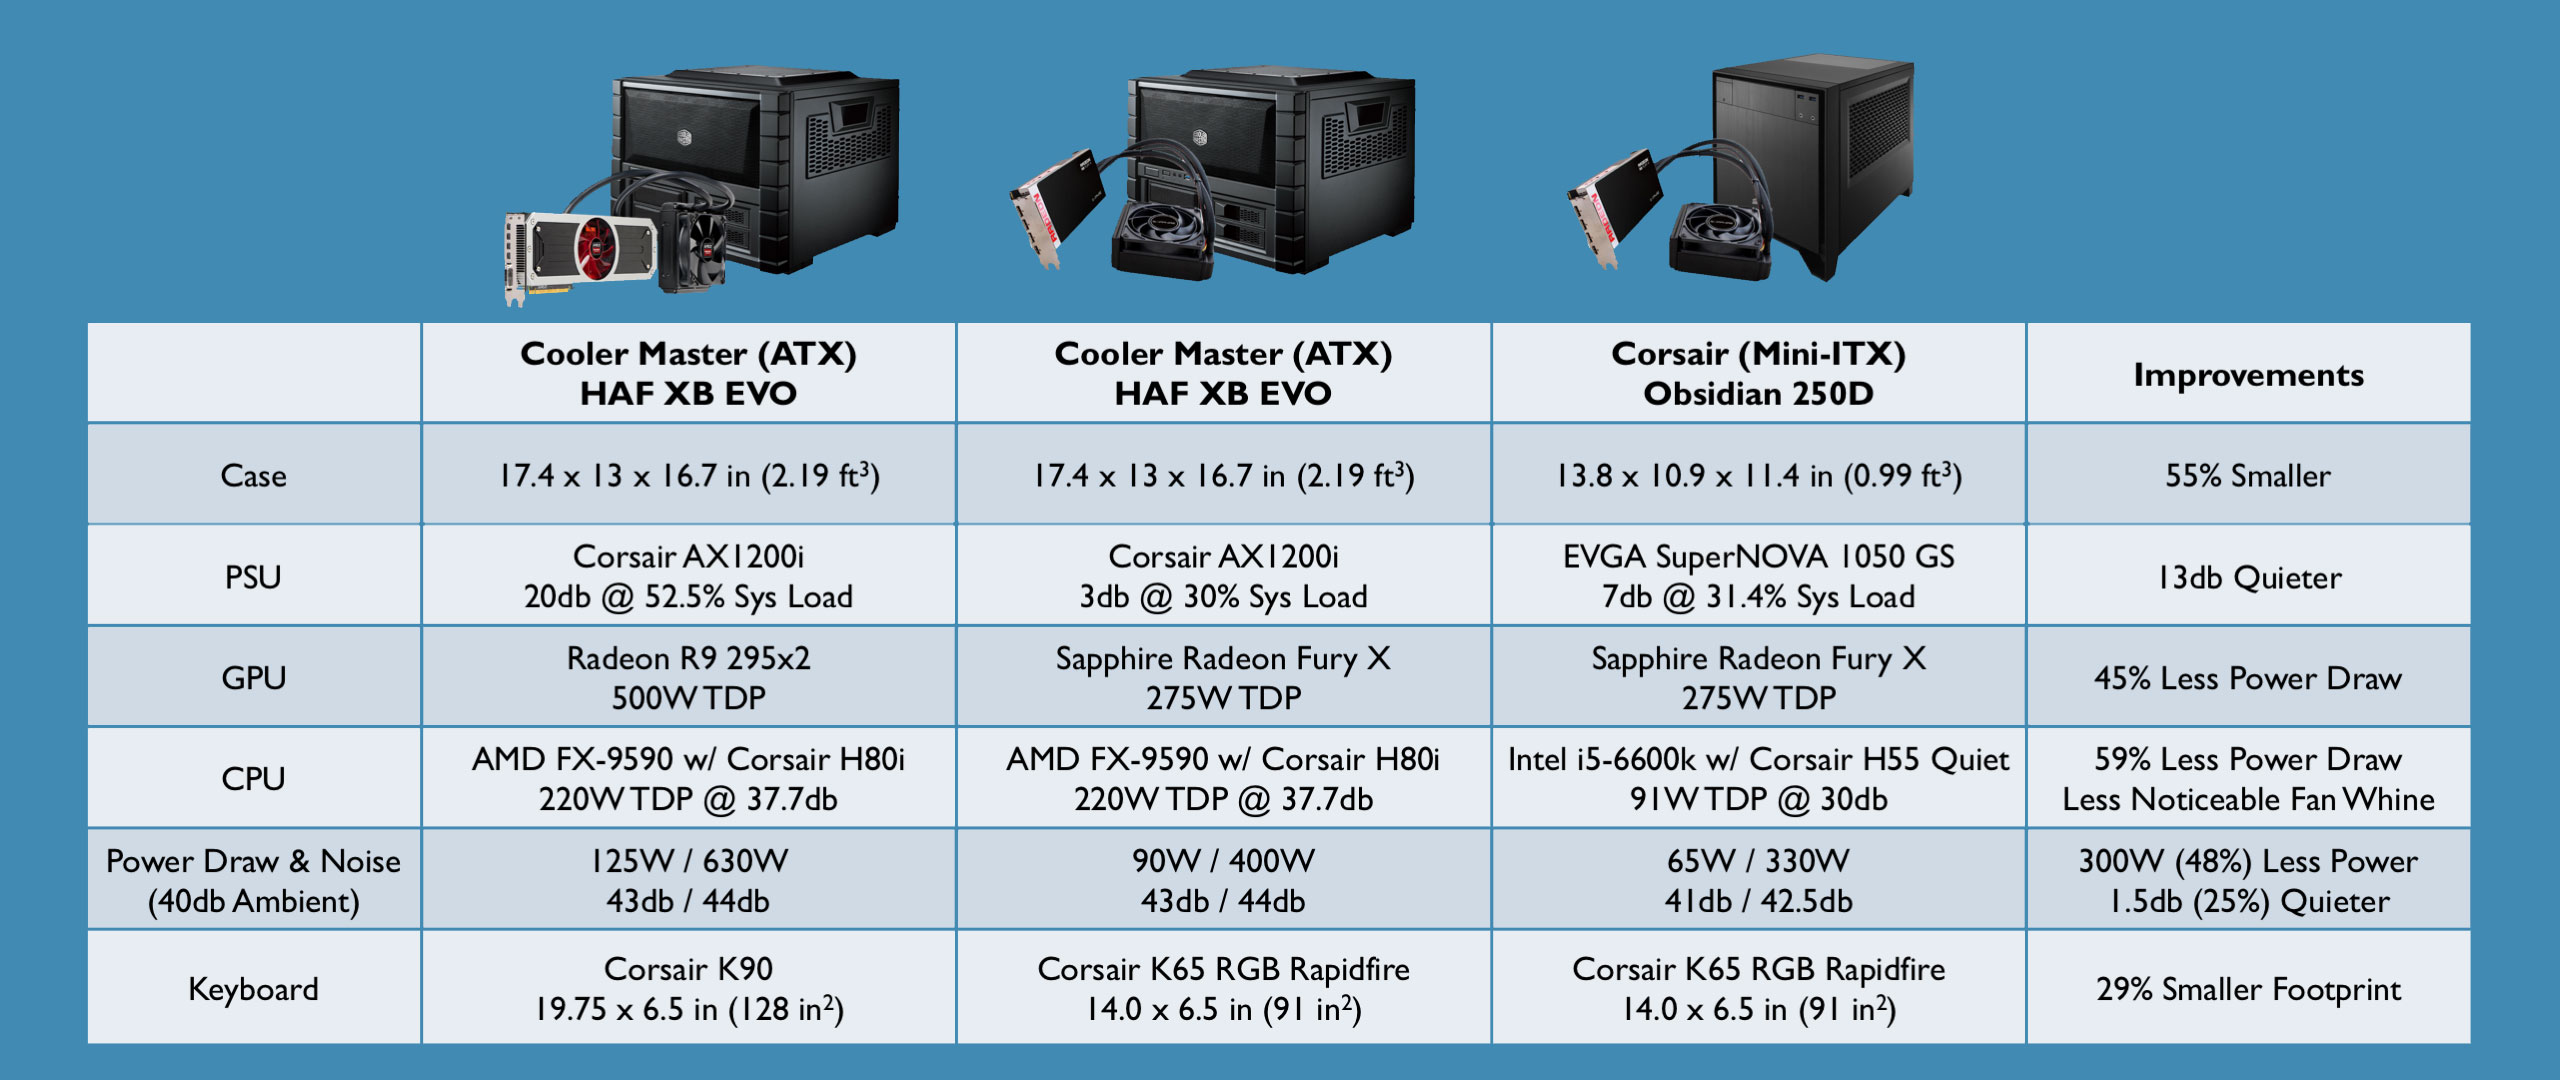
Before building the new rig, I first swapped out the Radeon R9 295x2 for the Radeon Fury X in the old rig. We can see the incremental and total improvements here in this chart. In the end, I achieved a roughly 50% reduction in case size and total power draw. This comes along with a 1.5db reduction in system noise, which translates to a 25% reduction in perceived noise level.
The new keyboard itself is 29% smaller without the macro keys and 10-key keypad, both of which I never used. This might not seem like a big deal, but on a crowded desk with the 250D, two laptops and 2-3 sets of mice and keyboards, this makes a big difference.
On a side note, I do really like the new switches on the Corsair K65 RGB Rapidfire, and will get a review out on the keyboard soon.
Benchmarking
Unigine Valley
With the environmental items successfully achieved, let’s look at performance. Another great benefit of swapping out the GPU in the AMD-based rig, and then building the Intel based rig, is that we can take a step-by-step look at performance changes.
First we’ll look at the Unigine Valley demo. It was run on the High preset with 4xAA, at 3440x1440 ultrawide and triple 1080p Eyefinity.
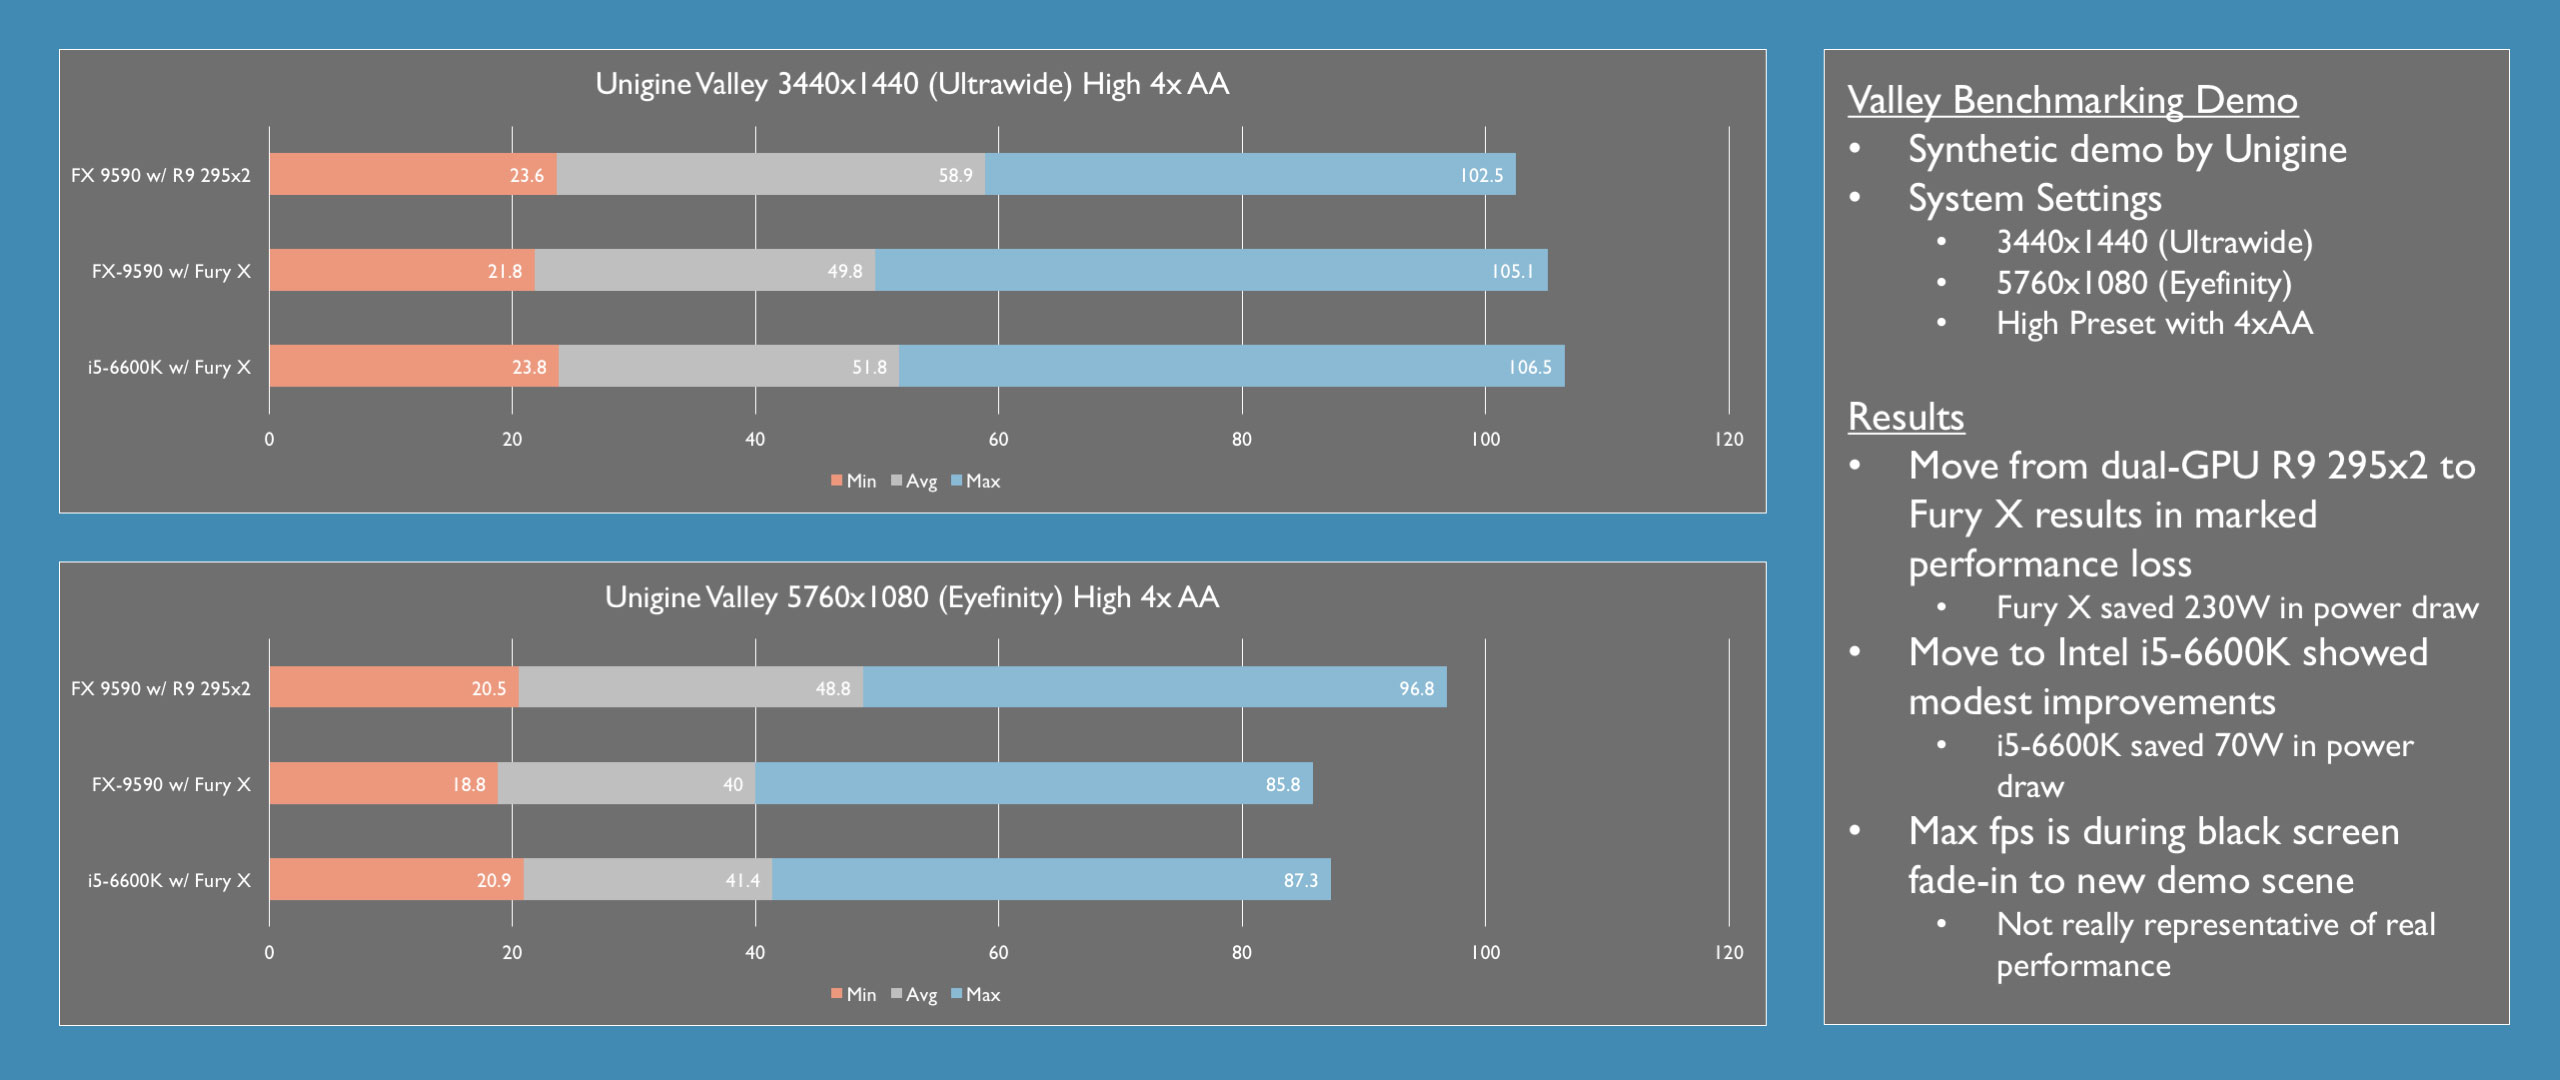
Moving to the Fury X did result in a noticeable drop in performance at average fps. In 1440p ultrawide, the benchmark lost 9 fps, going from 59 fps to 50 fps. Minimum fps dropped just 2 fps. Eyefinity saw similar performance hits.
Maximum fps on this test really doesn’t mean much, as it’s measured during a fade from black, so we’ll drop that out of the graphs at this point.
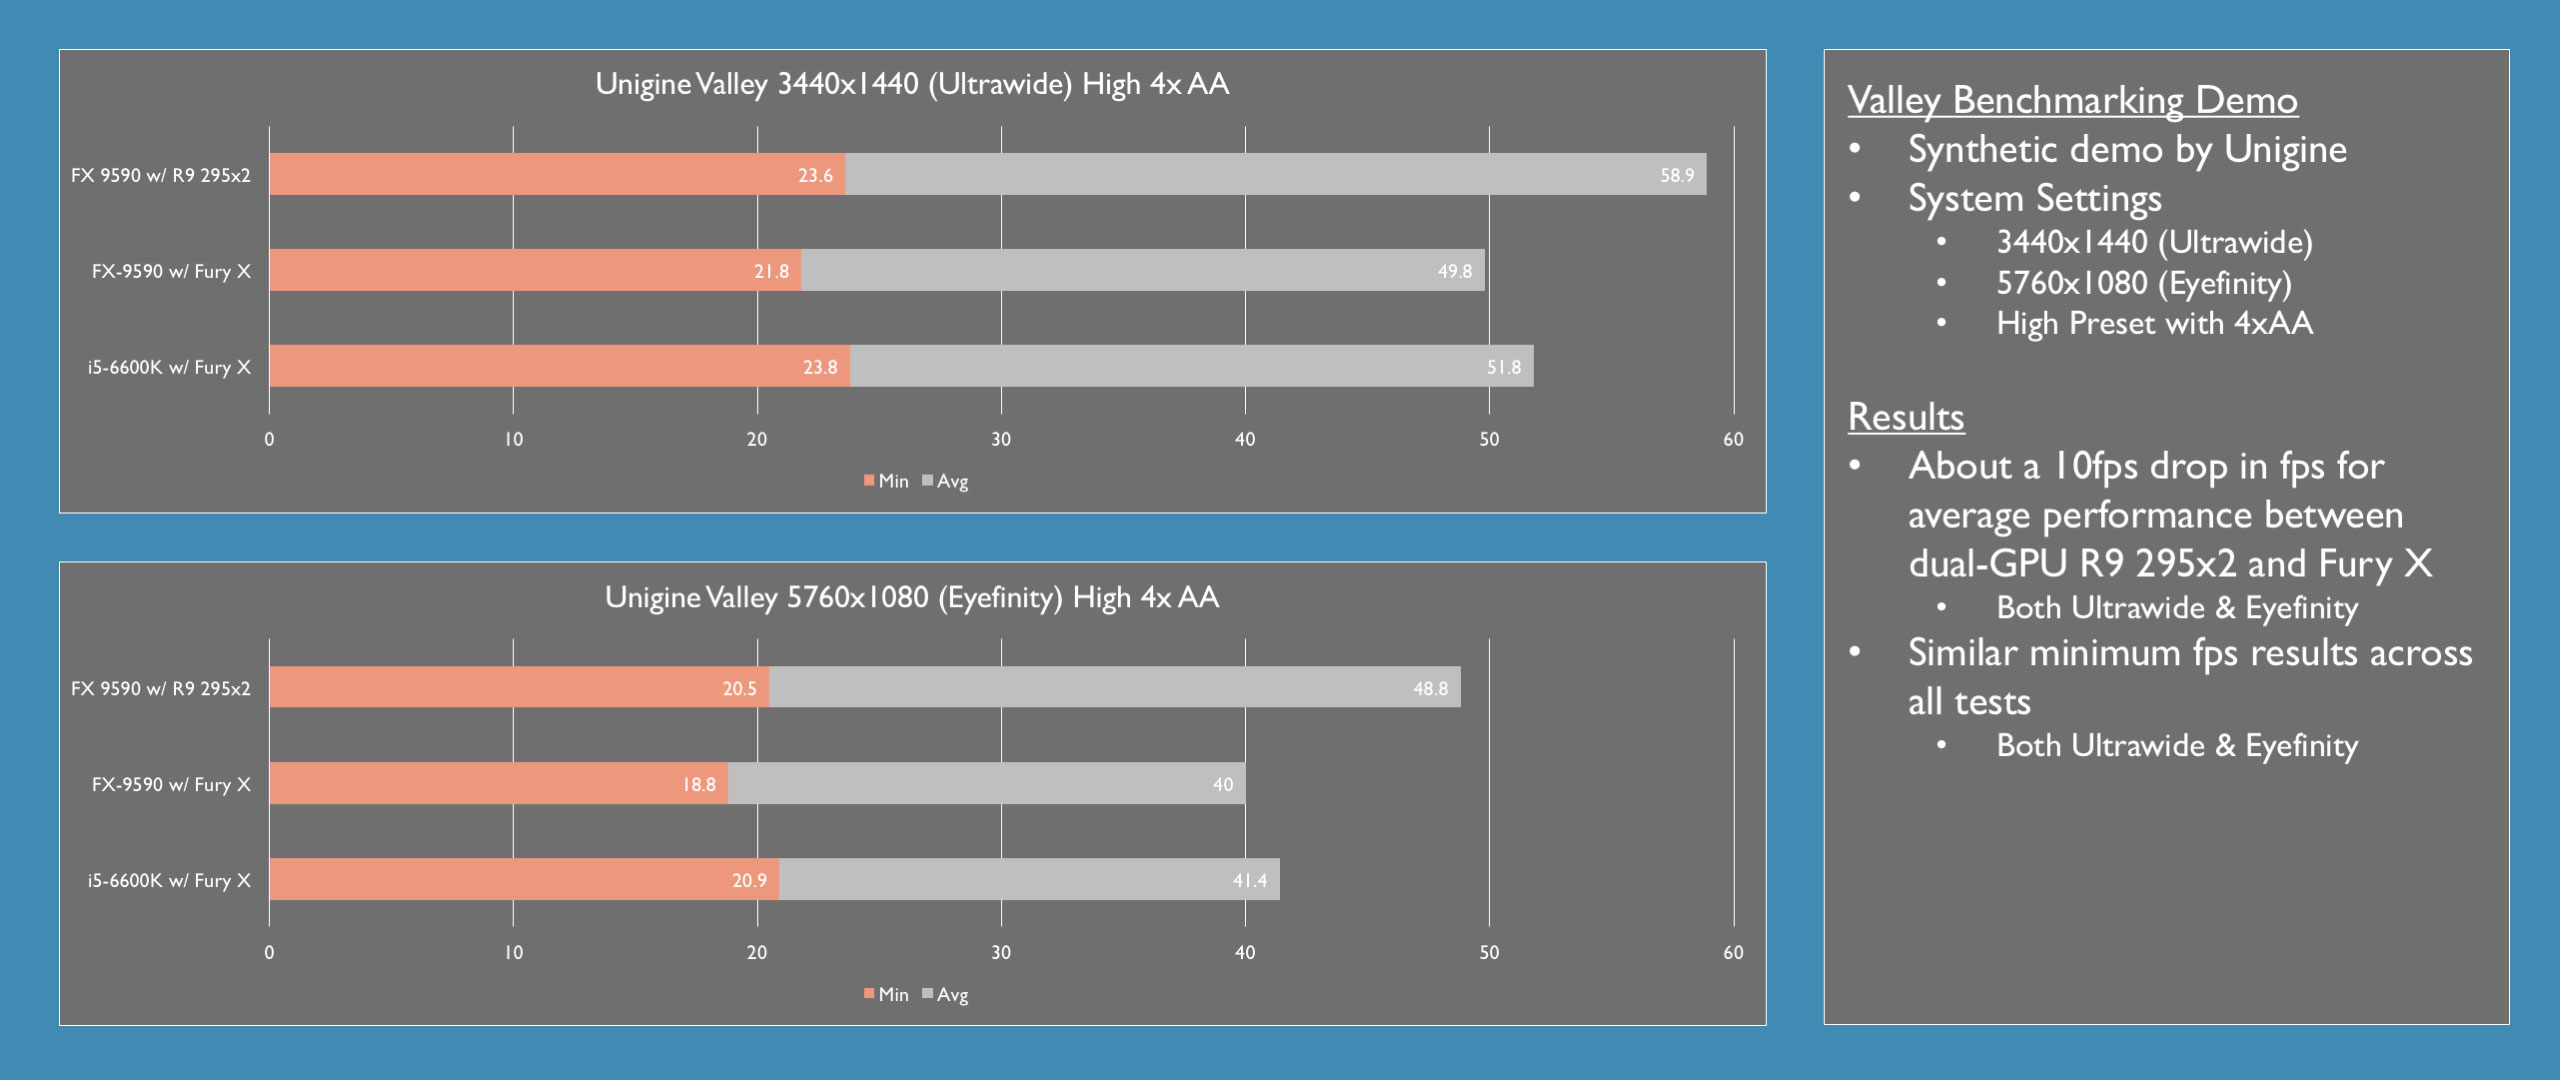
Moving to the Intel i5-6600K added back those two frames at the minimum, and added back about 2 frames on the average. The end result is a steady minimum frame rate, and a loss of 7 fps (12-14%) on the average, at a savings of 300W of power draw. This is a synthetic test, and can’t be taken as the be-all-end all of performance.
The Witcher III: The Wild Hunt
The one game I’ve been playing a lot of is The Witcher III: The Wild Hunt. Although it came out a year ago, it’s been steadily upgraded with both free and paid DLC. In fact, at the time of my build and testing, the final DLC – Iron and Wine – had just been released. The game is gorgeous, and is known to be difficult on systems at higher resolutions and quality settings.
My benchmark run is a walk through White Orchard, which is the first village you work during the game. My benchmark run is a minute and a half trot, starting at the bridge, going through the village, turning right and going across river, back down a trail through the grasslands, and ending up back at the bridge. It offers a mix of a village, people, geese, water, lots of foliage, and lighting effects from the setting sun.
I benchmarked on High presets for both Graphics and Post-Processing. I did turn off NVIDIA Hairworks. Even after all the driver and tessellation brouhaha settled out, I never used the feature. Hair that bouncy is fine in a shampoo commercial, but iy has no place on the head and shoulders of a Witcher.
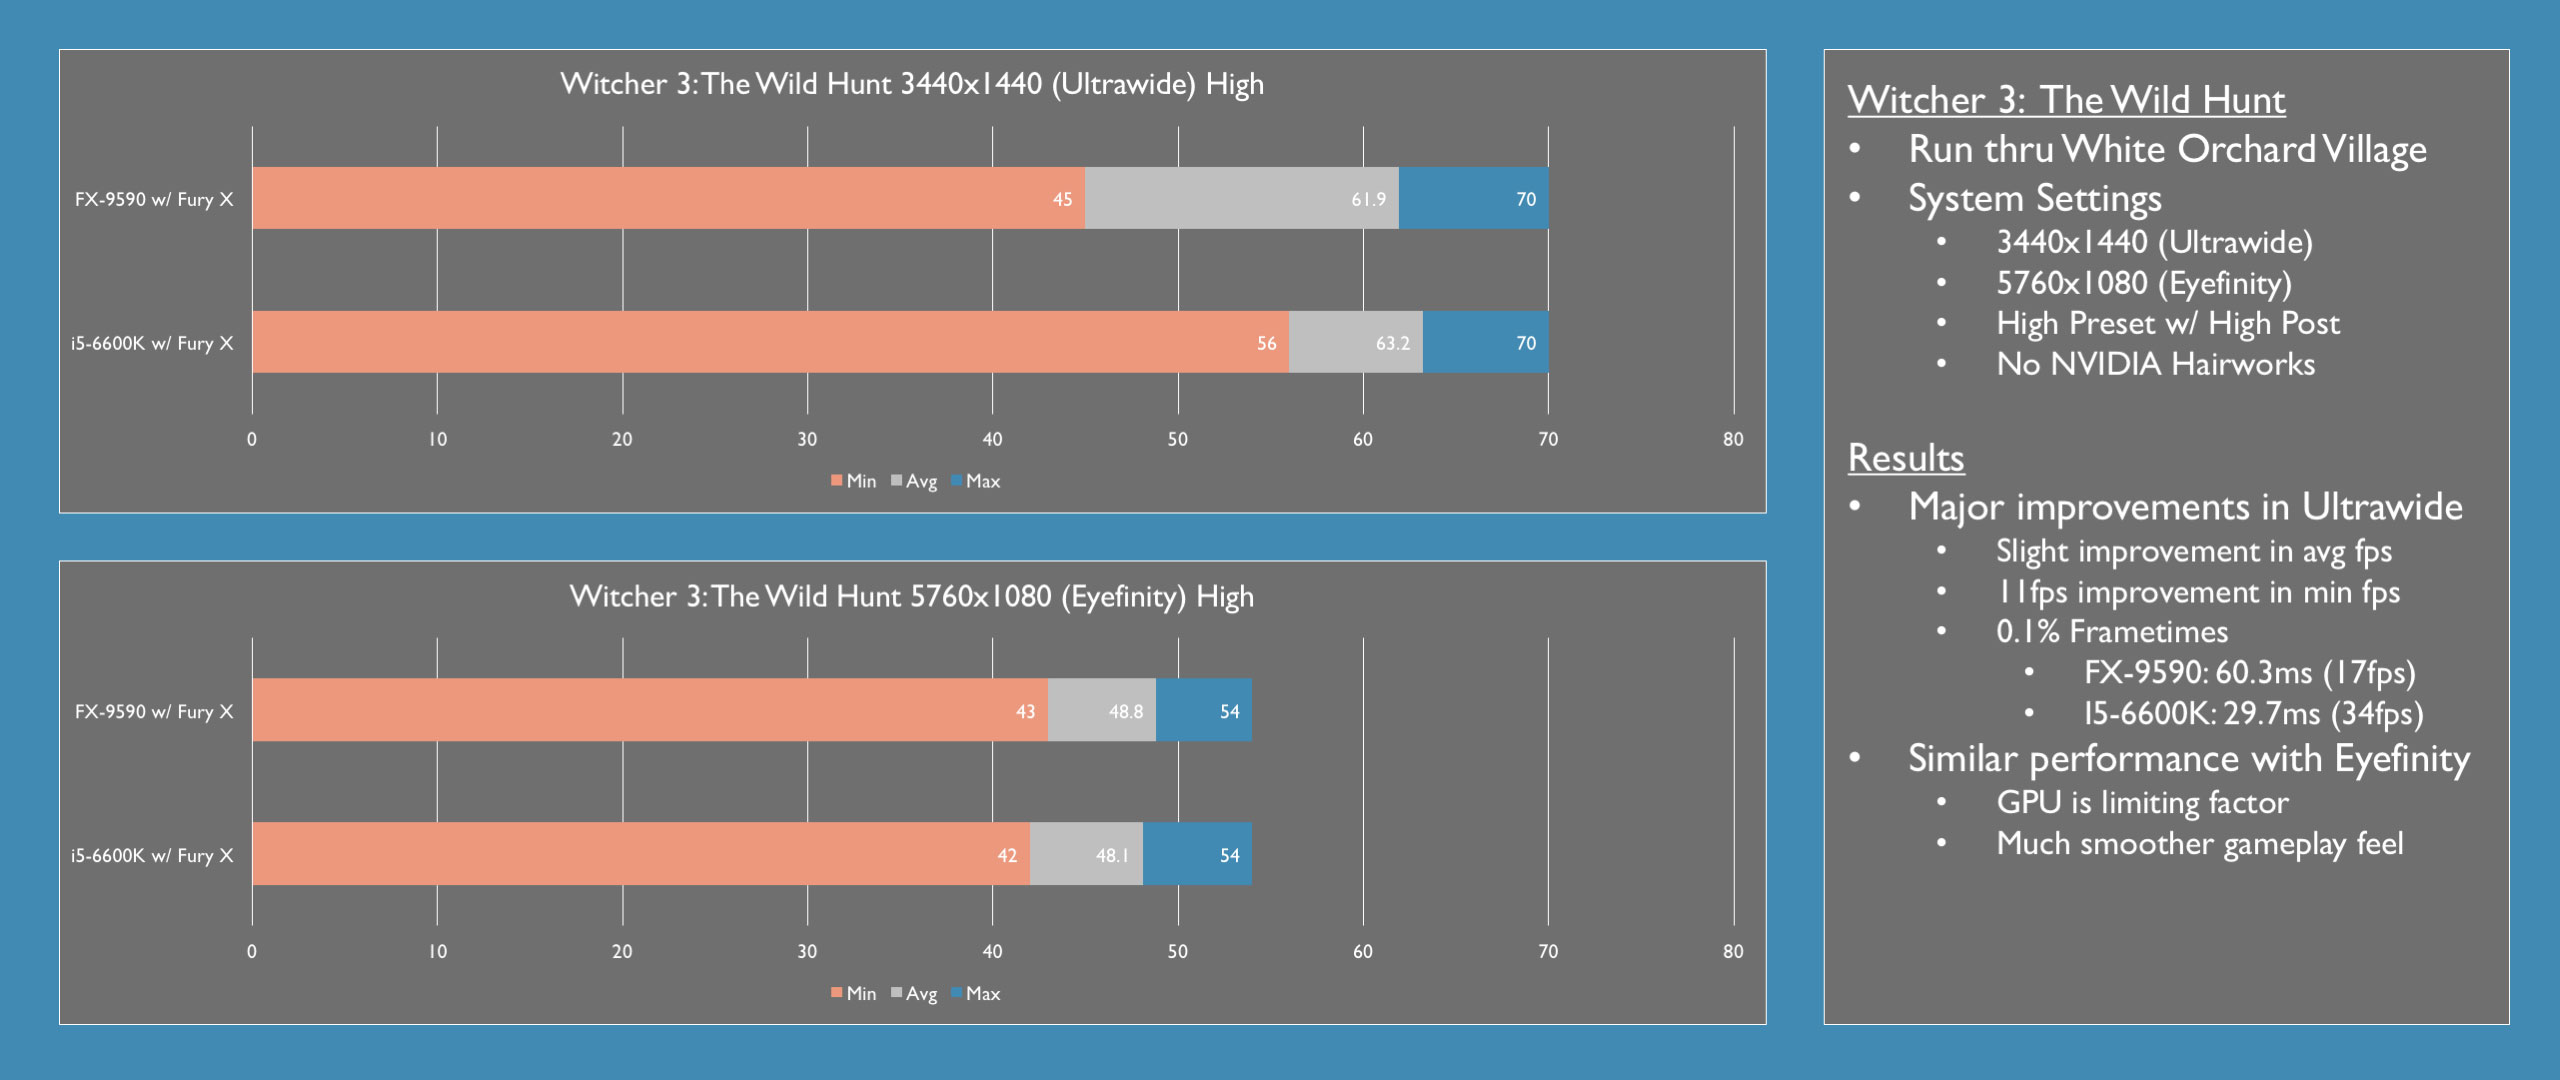
In Eyefinity we see that the max fps is consistent at 70 frames between both GPUs, and the average improves by 1fps. The great revelation is in the minimums. With the AMD FX-9590, the minimum fps as recorded by FRAPs was 45fps. With the Intel Skylake i5-6600K it was 56fps. This 11fps jump is HUGE, and represents a 25% improvement.
The Min Max Avg benchmark on FRAPS only polls once per second, and will probably miss intermittent peaks and valleys in performance. This is solved by looking at the 0.1% frametimes.
These are the bottom 1/10 of one percent of frame times and performance, where the user experiences moments of stutter and stopping. And here we also see massive improvements. With the FX-9590, the 0.1% frametime was 60.3ms, which correlates to 17fps. With the i5-6600K, this absolute minimum is halved to 29.7ms, or 34fps.
Looking at the Eyefinity data, the numbers are very similar, and within the margin of error. The GPU is the limiting factor here. But, I can tell you qualitatively, the Skylake CPU provided a much more consistent and much more enjoyable experience. You take this along with the price and thermal profile, and the i5-6600K is obviously a winner.
I’ve already established that I met my environmental goals with flying colors – half the size, half the footprint, half the power draw, and almost half as quiet. I think the data here shows that I’ve also easily met my performance goals as well. Between the i5-6600K and the Radeon Fury X, there is a ton of awesome performance and great gaming to be had in less than one cubic foot.
Major Component Review
After completing the build in early June, which I live tweeted with the hashtag #livebuild, I was so happy with the end result and performance, I couldn’t help but spend the next month and more finishing the main quest and storyline in the Witcher 3.
That means that this video build log was delayed by another month, but it also means that I’ve had plenty of time to live with the build itself and reflect on the experience.
Case - Corsair Obsidian 250D Mini-ITX
Overall I found the Corsair Obsidian 250D very easy to build it, especially considering its small space and Mini-ITX form factor. The space will be more difficult to work in if you leave the optical drive tray installed.
My only real complaint is the confusion over the H100i cooler. In the end I couldn’t have used a 240mm rad, since I was using a GPU with a closed loop cooler as well. But, I do think that Corsair should make it clearer on the 250D product page that it’s actually the older cooler that is supported.
Also, I have no idea why the v2 cooler doesn’t work, or why Corair designed a newer version, which is supposedly the same size, that doesn’t work in the Corsair 250D. Support for a 240mm radiator is a key selling point on the product page, so lack of support for the newest version strikes me as odd.
But, as GI Joe said, knowing is half the battle. In the end this issue doesn’t taint my opinion enough to not recommend the case, and indeed I still highly recommend it. This is a great, roomy, small form factor case, that is easy to build in, and offers plenty space for enthusiast class components, which pack tons of horsepower.
The case runs less than $100, and honestly you’d be hard pressed to find a better value even if the case cost significantly more.
Motherboard - EVGA Z170 Stinger
The next component I want to look at in detail is the EVGA Z170 Stinger Mini-ITX motherboard. While there is great consistency amongst ATX and event Micro-ATX motherboards, Mini-ITX motherboards tend to be unique beasts. The small size necessitates that each OEM makes trade-offs with each product they design and build.
For the Z170 Stinger, I chose features such as the LED debug display and the on-board power and reset switches, in lieu of a multitude of fan and SATA connectors, and any USB 2.0 headers. In the end, I think the trade-offs are good, and even preferred, but there are some issues with the board layout.
On the Z170 Stinger, the CPU power, LED debug and power/reset buttons are near the edges of the board, while the USB 3.0 header and SATA connectors are nearer the center.
I don’t know what it would have taken to re-arrange the layout of the board, as motherboard design and configuration is a complex and delicate process. But, I personally would have rather seen the LED readout and the buttons closer to an interior location, with the USB header and SATA connectors on an edge.
This isn’t anywhere near a deal breaker, and is really just an annoyance and makes cable routing a touch more difficult. And really, these are the only complaints I can muster. The board has been nothing but rock solid and stable, and was a dead easy over clocker.
I was able to take the 3.5GHz i5-6600K to 4.1GHz simply by increasing the multiplier. This 600MHz increase represents a 17% overclock, without any changes to any more detailed settings such as voltage or bclock. The 4.1GHz was completely stable, but I never saw an improvement in real-world gaming, so I set it back to default, as I had no desire to generate any extra heat or noise.
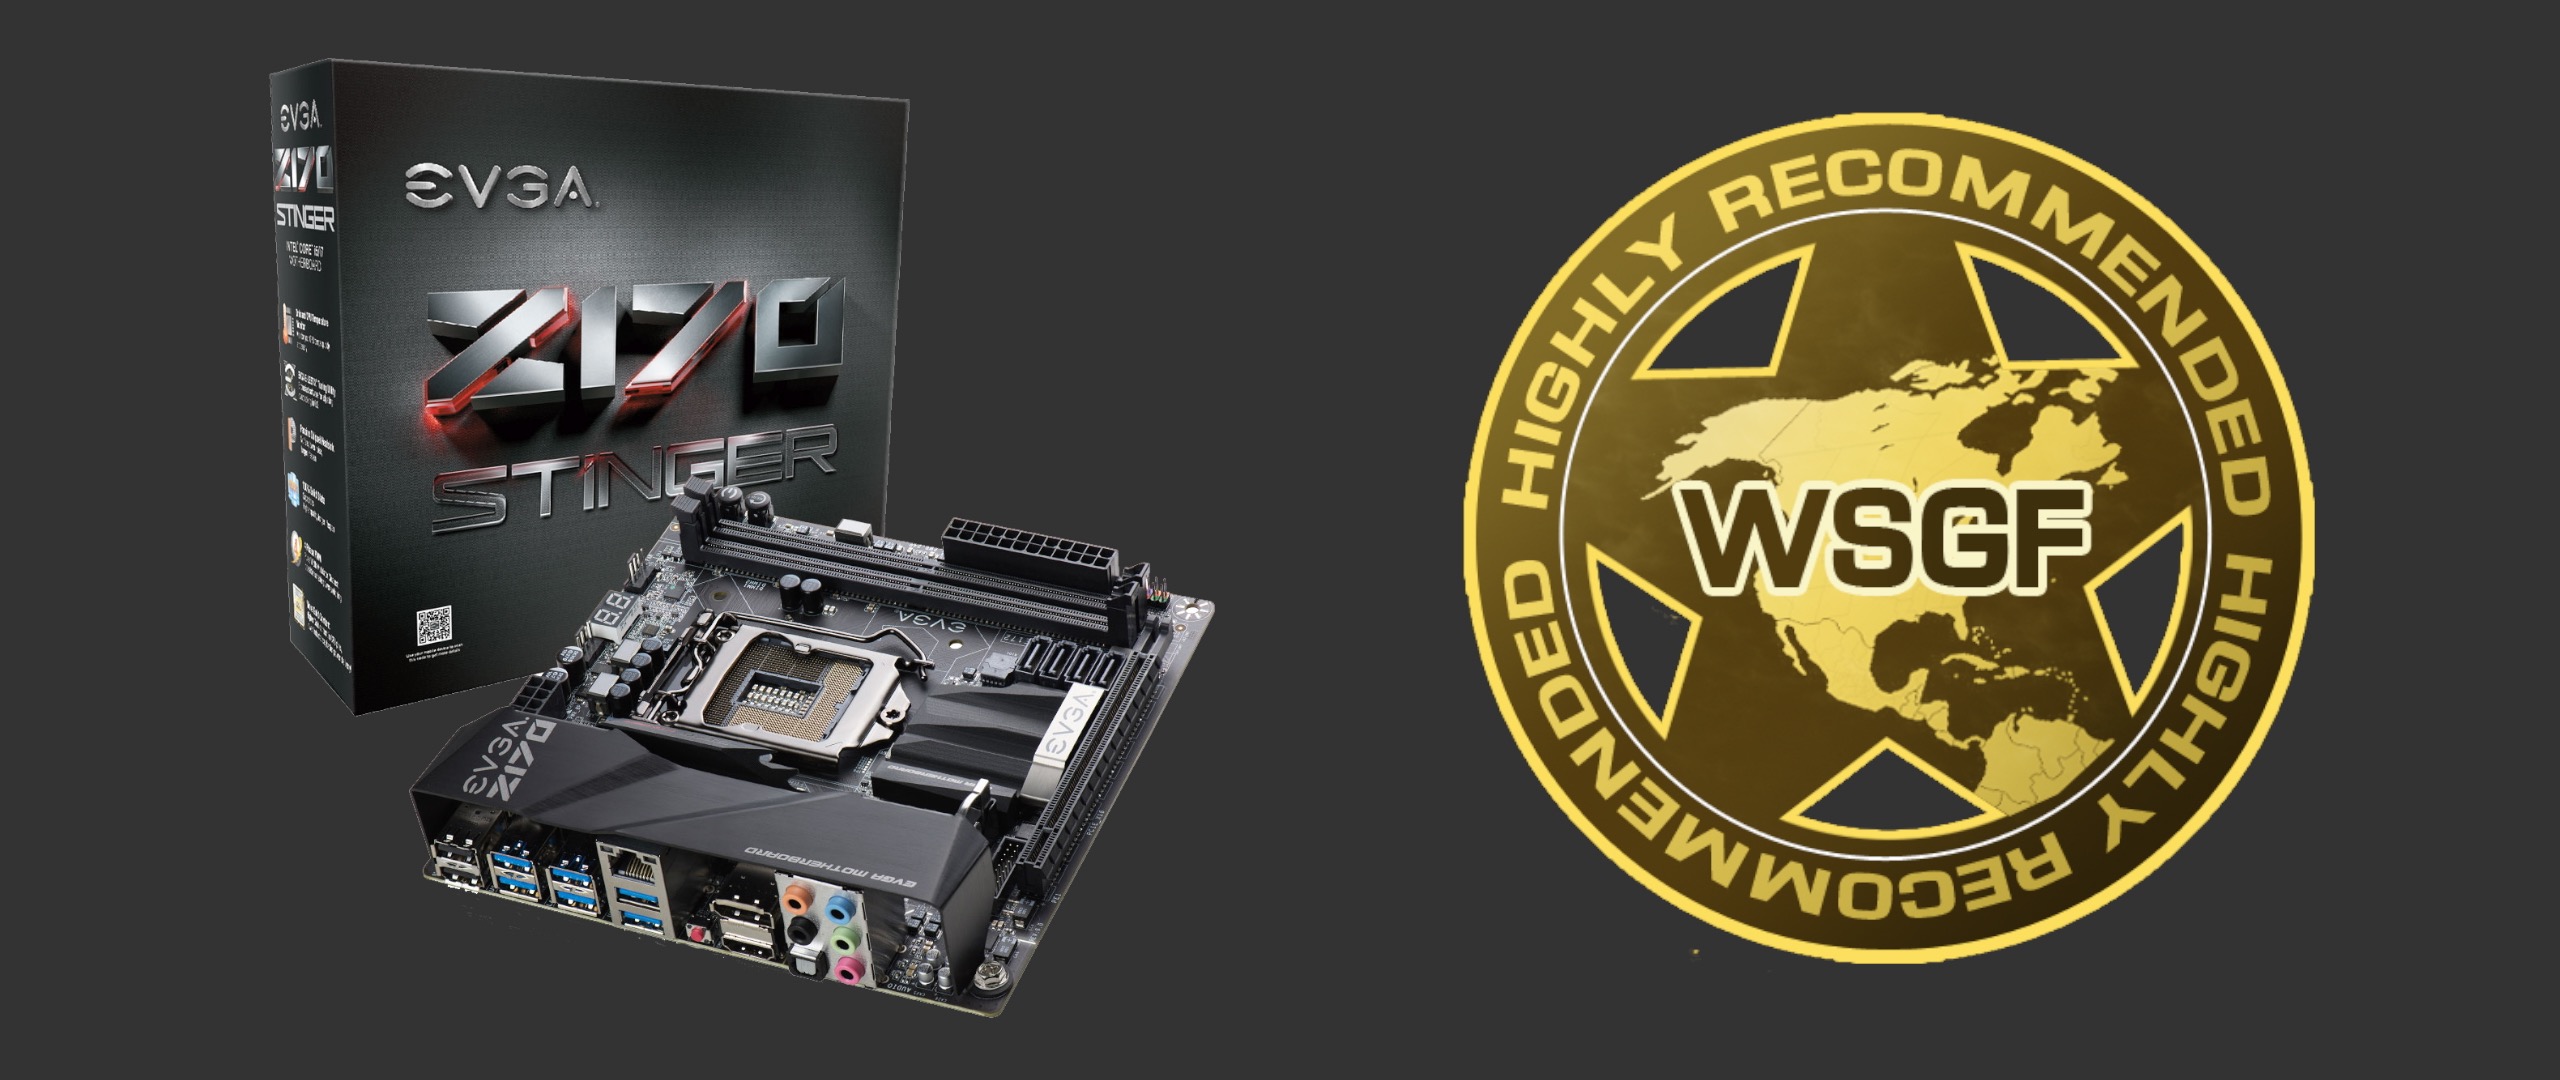
Given the features, stability and overclocking ability of the EVGA Z170 Stinger, I rate it as Highly Recommended.
PSU - EVGA SuperNOVA 1050 GS
My last item for individual review is the EVGA SuperNOVA 1050 GS. This 1050 watt power supply is designed for quiet operation, and indeed the EVGA marketing materials lead with “Silence is Golden”.
EVGA rates the 1050 GS as “Better” within their “Good, Better, Best” tiers. It delivers up to 87 amps on a single 12V rail, and offers Gold level efficiency and is fully modular. Up through 260W draw, the unit will be completely silent, and through almost 750W it will produce just 17db of noise.
Considering the i5-6600K and Fury X only pulled 330W, the SuperNOVA 1050 could conceivably run the Intel i7-6950X and a pair of NVIDIA GTX 1080s (total TDP of 550W) all while staying under 17db. All this and the unit retails for only $150. An amazing value here, and High Recommended.

I look forward to your comments and feedback in the forums.
